How To
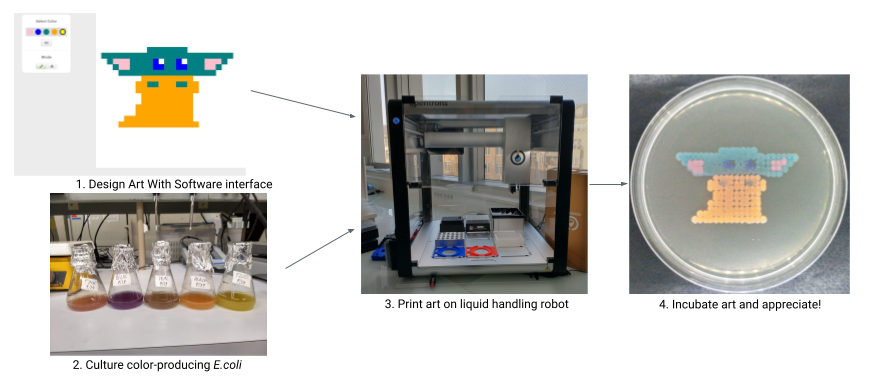
When drawings are submitted to bioartbot.org, they go into a bank of drawings waiting to be printed. Then, one of the people who make the prints takes the drawing and prints it with live bacteria. This page is for people who want to learn how to printing process works, with enough detail that they can do it themselves. If you want to print with BioArtBot, send an email to contact@bioartbot.org.
Running the BioArtBot printing process can feel a little daunting at first, but it’s really just a few steps, each of which has a lot of little things to pay attention to. Once you run it once or twice it goes really quickly. You can speed things up by building a routine - always having a sleeve of plates ready for printing, and printing as large of batches as possible so that you don’t have set up over and over again.
This page briefly discusses each of the major steps, and then there’s a big flowchart at the end for reference. Don’t be scared of the flowchart! It’s got a lot of information, but each individual step is pretty straightforward.
Specific notes for specific locations that BioArtBot runs are available below:
Running the Process
Prep
Each artpiece is printing on it’s own agar plate. Since agar plates take some time to pour and cool, it’s often easiest to pour these plates ahead of time, and then store them in a sterile bag. We find that, when properly stored, plates last several weeks.
Unless you’re doing experimental work, most people will print with the strains on the BioArtBot website, which grow best on LB agar loaded with the antibiotic chloramphenicol.
Get Protocol
Artpiece data is stored on the BioArtBot website. With a “Printer” login, you can get the data for any artpiece (or set of artpieces) and transform them into a protocol that can be run on the Opentrons OT2 liquid handling robot.
To do this, use the computer you plan to connect to the OT2 with to navigate to bioartbot.org/print and log in. Once you’ve logged in, you should see a list of artpieces that are available to print. This list shows all art that has been confirmed by its creator and has not been printed.
Select the art you will print by clicking anywhere on its line (except for directly on the image, which won’t work).
Next, select the labware you will use to print the art. The default is a 90mm round petri plate, which is also the most common plate used in most bio labs. If you’re not sure what plate you’re using, it’s probably this.
Finally, click “Request Print Protocol”, which will make popup showing you the artpieces you will print. Click the “Click To Download Your Procedure” button, which will cause a Python file to be downloaded to your computer. If you get any warnings about the filetype being dangerous you can ignore them.

Load Protocol
If you haven’t, you should download the Opentrons App to the computer you’ll use to connect to. Opentrons has very nice documentation for how to use it. We’ll be using it to upload and run our Python protocol and manage the robot calibration.
Ideally, you won’t get any upload errors, but, because Opentrons is always updating their software, it’s not uncommon. The Troubleshooting section at the end of this document discusses what to do with some of the more usual errors.
Once you’ve uploaded, the OT2 simulates the protocol and displays comments and steps in the “Run” window. Before doing anything else, look at that display and note which colors are expected for this printing, and where they will be loaded on the robot.
Load Materials
Get the strains that will be used in this printing from the -80C. We have found that the most time-efficient method is to use an entire 1ml glycerol stock for each printing. Strictly speaking, this is pretty wasteful, since you’ll use at most 500ul in even an ink-heavy print. However, the alternative is to streak the stock as you would for a normal stock, then, pick a colony to grow in liquid, which could then be used for printing. Since this would take days, it’s easier to just make lots of glycerol stocks and use them completely.
Speaking of glycerol stocks, if you notice there are 2 or fewer stocks left in the box, this is the time to make more. There aren’t backup stocks if we run out. See the section below on making glycerol stocks.
Allow the stocks to melt and load them onto the plate you’re using for the “bio-inks”. The default is to use a cryo tube holder, which is nice because you simply need to place the cryo tubes themselves into the holder and remove the caps when the run is ready. If you don’t have a cryo tube holder, you can use any plate that’s big enough and load it with a pipette.
Watchout! Many people default to loading colors along the top row - presumably because that’s how we read. However, the robot lists colors along the leftmost column. You should load the colors along the leftmost column.
Load the pipette rack, color plate, and all agar plates as indicated on the Opentrons app. If you are using SBS plates, then they should fit into the slots. Otherwise, you’ll use plate adapters, which if you don’t already have are available in the BioArtBot Hardware Repo.
Calibrate and Run
Follow the prompts on the Opentrons App to calibrate the robot for the protocol. Note that you can use the keyboard to make this part faster.
The agar plates have to be calibrated in a non-standard way. Rather than calibrating to the top lip of the plate, you should align the X and Y axes as normal, then slowly lower the pipette tip until it just touch the agar. The easiest way to do this is to move the pipette down 0.1mm at a time and watch the light reflecting off of the agar. When you see the light warp slightly, that means the pipette is pushing tip on the agar, which is what we want.
It is preferable to go too deep rather than not going deep enough. If the tip does not go deep enough, then the small amount of liquid dispensed will stick to the tip and whole parts of the the artpiece won’t print. Conversely, if the tip goes too deep, it will pierce the agar, which isn’t ideal, but has a minimal effect on the artpiece.
After calibration, follow the prompts on the app to run the protocol normally. It’s often a good idea to watch the first few pixels get printed to ensure the robot is doing everything successfully. After that, you can safely walk away. Printing takes something like 5 to 10 minutes per plate, depending on how much whitespace is in the drawing.
It is best to close the robot door while printing, to minimize plate exposure to airborne contaminants.
 The robot placing droplets along an agar plate
Incubate
Once the robot has finished printing, check the make sure that the liquid droplets on the plates have completely dried. This usually take just a few minutes. Then unload the plates and label them with tape.
The microbes grow best when incubated at 30C for 48 hours. If you’re time-constrained, they will grow at 37C for 24 hours, but many of the colors will not express colors very strongly.
You can incubate the plates in any incubator, but if you have a SPIRO plate imaging device (see section below), you should use that to make time-lapse movie of the art growing. If you’re not using the SPIRO, you can skip ahead to the next section.
When you load the SPIRO, you should load one plate per side of the stage. This means that if you’ve printed more than four pieces, they can’t all be imaged this way. Square plates slide into the slot, and round plates sit in the divot at the bottom of the slot. Try to keep track of which side is the top of the art and load it that way so that the video doesn’t have to be manipulated later. However, if the lid is very foggy, you can load the plate with the lid facing in and the art will be visible through the agar, albeit in a slightly discolored way.
 The SPIRO plate imager. A Raspberry Pi camera on the left takes pictures of the plates on the right, lit by LED strips in the middle.
Use any computer’s browser on the local network to connect to the SPIRO control panel. Details on this can be found in the SPIRO section below. On the Experiment tab, set the experiment to run for 2 days, with images taken every 15 minutes. You may have to delete some files from the card if it’s full. Once you’re sure the files have been back up somewhere else, it’s fine to delete these.
Start the experiment - you should see images of each of the four plates appear on the screen. It may take a little while, since the device has to home itself and then take an image of each of the four plates. Until it has done so, the last images taken may be displayed.
Now wait 48 hours for the microbes to grow.
Finishing Up
Once approximately 48 hours have elapsed, use any computer to browse to the SPIRO control panel and download the .ZIP file containing the run. Each .ZIP file has four folders - one for each plate. Inside each folder is one image for each photo taken. These can be assembled with video software into a time-lapse, but that won’t be covered here.
If the last image for each plate is of high quality, we can use that as our final still image of the art. If it doesn’t look good for any reason, we can use any camera (a smart phone is handy) to take an photo as a backup. Lighting on agar plates is tricky, so we suggest using a lightbox, like the kind in the BioArtBot Hardware Repo.
Once we’re confident that we have nice images and movies of the art, we can dispose them using the biosafety rules of the lab you’re in. Alternatively, plates can be preserved by pouring epoxy over them.
Finally, label all the files to match their artpiece and upload them to the BioArtBot Google Drive. These will be be processed and emailed to their original artists. In the future, we want to make this last step more seamless - let us know if you want to help with that!
Altogether In One Flowchart

Troubleshooting
All kinds of small errors can occur when uploading the protocol to the Opentrons App. This is the integration point between the pure BioArtBot stuff and the Opentrons stuff, so when either codebase changes it can cause issues here.
A good way to help figure out what’s going wrong is to open the Python file that you downloaded from bioartbot.org and make changes as necessary. Opentrons has very good documentation for their API, which will help you figure out what’s going on.
Some common issues are:
- Labware not found
- BioArtBot uses a handful of custom labware definitions to allowing printing onto agar plates. Most crucial are the labware definitions for the agar plates, since these are built with specific distances between pixels in mind. If you do get an error, first check the custom labware definitions in the Opentrons app to see if you have an old version of the agar plate definition with a different name. If not, email contact@bioartbot.org for a copy of the correct definition.
- You may also get an error for the cryo tube rack, since this is also a custom piece of labware. You can either change the protocol to use one of the standard pieces of labware, or you can laser cut your own cryo tube rack.
- Opentrons discusses labware definitions and how they work in their documentation.
- Pipette missing or wrong
- BioArtBot defaults to using the P20 single pipette, but a P300 or a Gen1 P10 can work in a pinch. If you don’t have the P20, you can open the protocol and change the pipette to the right value.
- An even easier problem is that you may have the P20 pipette on the opposite mount than BioArtBot expects. You can change the physical pipette, but it’s much easier to open the Python file and change the declared mount side.
Making Glycerol Stocks
Glycerol stocks are the best way for us to store BioArtBot strains long term, assuming the lab has access to a -80C freezer. As discussed above, we usually make a lot of stocks at a time so that we can use them whenever we want. A typical batch of glycerol stocks for BioArtBot is 15-20 per strain.
If the stocks are running low, it’s a good idea to make more. If you have less than 2, it’s absolutely crucial, since there are no other backups.
AddGene has a very good guide how to make glycerol stocks. Once you’re done, label them and put them back in the box in the -80C with the other strains.
It’s also a good idea to plate the culture you’re making stocks of to check that it actually expresses the color we want. Sometimes if the liquid culture is allowed to grow too long the color expression is reduced.
The SPIRO
SPIRO (“Smart Plate Imaging Robot”) is an open-source project by Alyona Minina and Jonas Ohlsson at SLU Uppsala. Their documentation is extensive and high quality.